WowWee Rovio : Unboxed
Introduction
|
Rovio Pictures - Slideshow
|
|
|
|
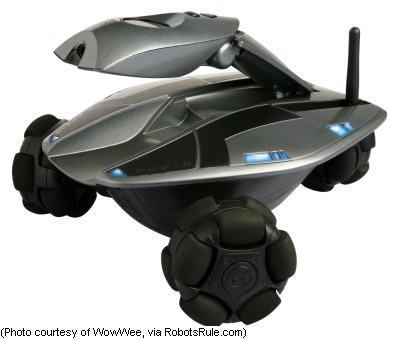
The WowWee Rovio is WowWees first non-entertainment robot, unlike their earlier robots which were either toys or entertainment robots. It is a versatile remote surveillance robot that can keep track of your home while you are away from it; allowing you to sleep peacefully on the road knowing your most important investments, your home and your family (and pets), are safe. Its also a great way to stay in contact with loved ones or pets that stayed behind, checking in on them just to say hello or to make sure they are not getting into any trouble. It can patrol your house automatically while you are away, sending you high quality pictures of different parts of your home via E-mail. Most importantly you can control Rovio and receive streaming video and audio from anywhere in the world you have an Internet connection and a browser compatible device including PC's, MacIntosh computers, a browser capable gaming console or PDA, and more. With the right browser platform you can also have two-way conversations with full video and audio turning the Rovio into a smart mobile VOIP based web cam. You can also use it as a web cam for Skype or MSN Messenger sessions. The Rovio is a full fledged 802.11 b/g device able to connect up to WiFi networks that support those protocols. It can be configured from either a Windows PC or Apple Macintosh dynamically if the computer has the appropriate WiFi card. PCs running Windows XP or Vista can use the included software CD and USB cable instead of using a WiFi card as an alternate means of configuring the Rovio. Later firmware and software updates from WowWee may give that ability to Apple Macintosh users too.
NOTE: Some of these pictures are accompanied by my lovely assistants, the talented and versatile Femisapien robot sisters who I have nicknamed Amy and Gale Rovio. Also, in fairness to the wonderful photographers that created the striking Rovio brochure pictures like the one at the top of this page, the following strictly amateur photographs were taken by me and my little Olympus Stylus 410 digital camera. Hence the difference in quality from what you see here and the professional quality photos like the one above and those in the Rovio Picture gallery.
 NOTE: Clicking on any photo will show you a large 1000 pixel wide version of the photo. NOTE: Clicking on any photo will show you a large 1000 pixel wide version of the photo.
Packaging - Box
This is the box that the Rovio comes in.
Front |
Back |
|
|
|
Side 1 |
Side 2 |
|
|
|
Top |
Bottom |
|
|
|
|
|
|
|
Packaging - Internal
The Rovio comes in a two-piece styrofoam molded enclosure. Unlike other robots you dont have to mess with any wires, straps, or mounting screws. You just pull the styrofoam crate straight out of the box, and lift one of the pieces. Here is a picture of the styrofoam crate and another showing you the Rovio safely inside waiting to be used.
Styrofoam Crate |
Rovio Inside |
|
|
|
|
Rovio
Here is the first picture of the Rovio itself showing its sleek 3 wheeled design. Next to it is a graphic courtesy of the WowWee Rovio manual that identifies the various parts of the Rovio.
Rovio |
Parts Description |
|
|
|
|
These two pictures give you a good view of Rovios top side.
These two pictures give you a nice shot of Rovios sleek futuristic design from the side.
Rovio Side 1 |
Rovio Side 2 |
|
|
|
|
Here is a picture of Rovios underbelly. Next to it is a graphic pointing out the battery compartment and charging contacts. The charging contacts connect with the contacts on the charging dock when you send the Rovio "home" for charging.
Rovio Underbelly |
Parts Description |
|
|
|
|
Rovio Wheel Close Up
Here's a good close up of Rovio's unique omni-directional wheel structure. As you can see, it uses the same principal as WowWee's incredibly mobile Tri-Bot robot which also uses rollers embedded in wheels. This wheel structure allows Rovio to make tight nimble turns while moving.
Rovio Omni-Directional Wheel |
|
|
|
Charging Dock and Mast
These pictures shows you the charging dock and mast. The charging contains a TrueTrack(tm) beacon. Along side that picture is a graphic that identifies each part. The part that looks like a lens is the TrueTrack(tm) beacon which is the device that projects two infrared light beams on the ceiling which the Rovio uses to patrol your home. This is the Northstar navigation technology that allows Rovio to navigate your home with great accuracy while following one of your patrol routes or returning to the charging dock for recharging. If you have a large home or need coverage of additional separate rooms, you can purchase additional TrueTrack(tm) beacons to cover those areas as well.
Charging Dock and Mast (Assembled) |
Parts Description |
|
|
|
Charging Dock and Mast (Unassembled) |
|
|
|
The picture on the left gives you a good top end look at the TrueTrack(tm) beacon which projects two infrared light beams on the ceiling as part of Rovios Northstar navigation technology. (See the graphic below).
|
|
Accessories
The photo on the left shows you the accessories that come with the Rovio. They included a 6 volt 3000 mAH Nickel Metal Hydride (NiMH) rechargeable battery pack for the Rovio. A preliminary rough draft version of the user guide. An 8 volt AC/DC adapter, a USB cable, and finally the Rovio Setup CD for Windows PC computers (Macintosh users, see note above). The photo on the right is just for fun and shows a Femisapien female robot with her dog Fluffy the Rovio.
NOTE: The manual shown is a preliminary manual and not the usual glossy high quality manual WowWee produces which will be present in the Rovio you buy. Also not shown is the Quick Start guide which wasnt available at the time this was written but will be in the final packaging.
Accessories |
A Robot Girl and her Dog |
|
|
|
|
Rovio With with Battery in the Battery Compartment
This picture shows you the NiMH rechargeable battery pack connected inside the Rovio
Rovio Underbelly with Battery In Place |
|
|
|
Rovio in Fully Assembled Charging Dock being Recharged
These two pictures show you the Rovio snugly tucked away in the charging dock and charging itself for the rest of my Rovio Review that is coming shortly.
Rovio In Charging Dock - front view |
Rovio In Charging Dock - side view |
|
|
|
|
WiFi Configuration Diagrams
I have included two WiFi network setup diagrams so you can get an idea of what kind of home network setup is required to work with Rovio. The networks shown are 802.11 b/g based networks using a Wireless Access Point to connect either directly to your broadband modem as shown in the Basic configuration, or to an internal router that connects to the broadband modem as shown in the Advanced configuration. Those of you with home networks will understand what these graphics mean. If you dont, dont worry. Ill be going in to this subject in greater detail when I post the rest of my Rovio review.
WiFi Setup : Basic |
WiFi Setup : with Wired Router |
|
|
|
|
Conclusion
At the time this was written I had not dug deeply in to the software and the Internet connection setup process; which are two of the most crucial non-hardware topics when working with a complex and versatile product like the Rovio that streams audio and video over the Internet; especially given the added powerful feature of web browser based remote control. Bookmark this page or check back later to see the rest of my Rovio where I cover all aspects of the WowWee Rovio in detail including setup, IP address issues including DNS services to use with your Rovio, creating patrol routes, and a lot more. Also, watch for the upcoming video review which I will publish soon after the full written review, to give you a real solid feeling for what it's like to own the sleek and powerful WowWee Rovio spy robot.
|


